
NeoPixel Matrix
Overview
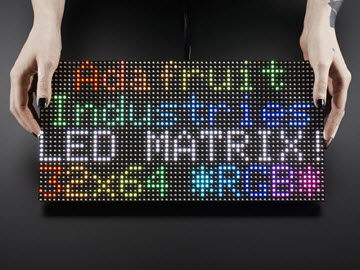
A matrix library using WS281x (NeoPixel). It can display text, shapes, images, and multiple matrices can be connected to create large displays like electronic signage.
Supported GPIO
- Raspberry Pi 0~4
Commands
[INIT]
Enters initial configuration settings.
| Item | Type | Description |
|---|---|---|
| GPIO Pin * | WRITE | Enter the GPIO pin number connected to the LED. |
| Width Pixel Count | WRITE | Enter the number of horizontal pixels in one matrix. |
| Height Pixel Count | WRITE | Enter the number of vertical pixels in one matrix. |
| First Pixel Position | WRITE | Select the position of the starting pixel in the matrix. This refers to the LED connected to the Raspberry Pi GPIO. (Top Left, Top Right, Bottom Left, Bottom Right) |
| Pixel Layout Direction | WRITE | Select the direction in which pixels are arranged (connected) in the matrix. (Horizontal, Vertical) |
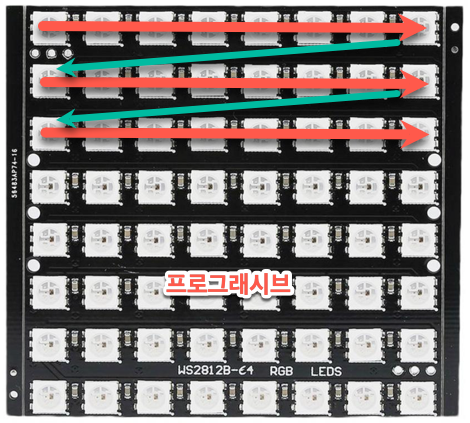
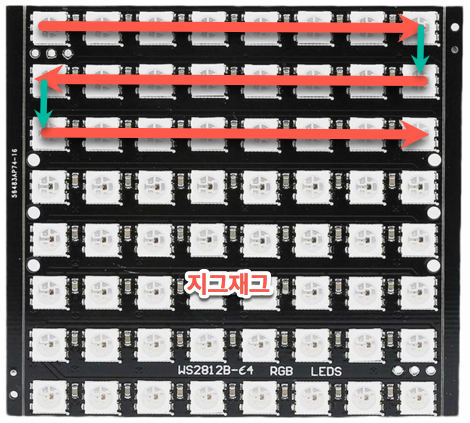
| Pixel Layout Type ² | WRITE | Select the way pixels are arranged (connected) in the matrix. (Progressive, Zigzag) |
| Module Type | WRITE | Select the module type. (WS281x, SK6812) |
| Operating Frequency | WRITE | Select the operating frequency of the module. (400kHz, 800kHz) |
| RGB Order | WRITE | Select the RGB order of the module. (RGB, RBG, GRB, GBR, BRG, BGR, RGBW, RBGW, GRBW, GBRW, BRGW, BGRW) |
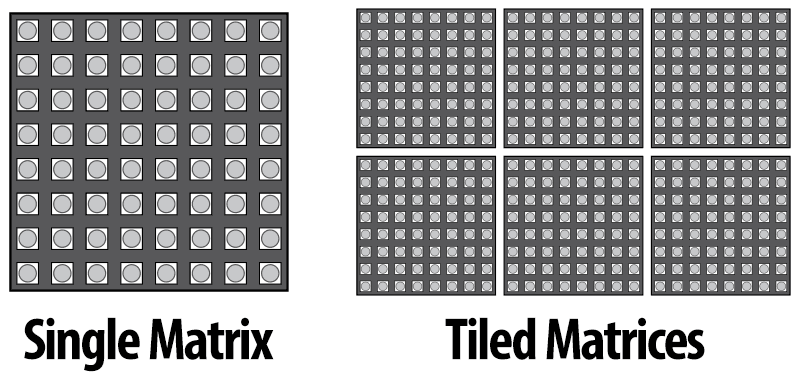
| Matrix Horizontal Count | WRITE | The number of matrices arranged horizontally. |
| Matrix Vertical Count | WRITE | The number of matrices arranged vertically. |
| First Matrix Position | WRITE | Select the position of the first matrix. (Top Left, Top Right, Bottom Left, Bottom Right) |
| Matrix Layout Direction | WRITE | Select the direction in which matrices are arranged (connected). (Horizontal, Vertical) |
| Matrix Layout Type ** | WRITE | Select the way matrices are arranged (connected). (Progressive, Zigzag) |
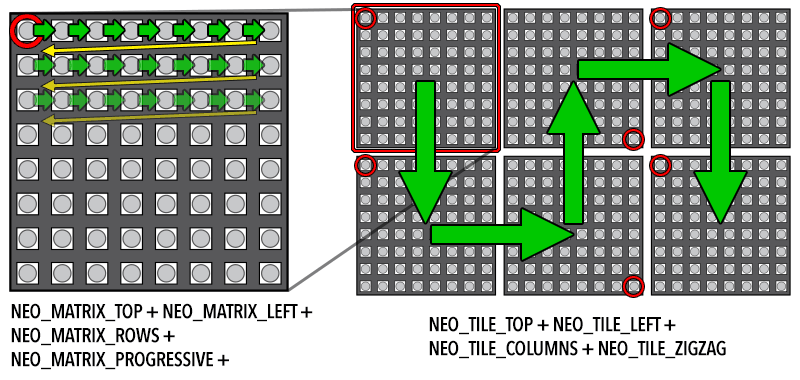
** The description of pixel or matrix layout types (Progressive, Zigzag) is as follows.
An example of initial settings for matrix direction and layout is shown below.
| Item | Value |
|---|---|
| Width Pixel Count | 8 |
| Height Pixel Count | 8 |
| First Pixel Position | Top Left |
| Pixel Layout Direction | Horizontal |
| Pixel Layout Type | Progressive |
| Matrix Horizontal Count | 3 |
| Matrix Vertical Count | 2 |
| First Matrix Position | Top Left |
| Matrix Layout Direction | Vertical |
| Matrix Layout Type | Zigzag |
[SET_BRIGHTNESS]
Sets the brightness of the matrix.
| Item | Type | Description |
|---|---|---|
| Brightness | WRITE | Sets the brightness of all connected LEDs. (0~255) |
[SET_ROTATION]
Sets the display orientation of the matrix.
| Item | Type | Description |
|---|---|---|
| Rotation Direction | WRITE | Select the direction in which text, images, etc. are displayed on the matrix. (0°, 90°, 180°, 270°) |
[SET_CURSOR]
Specifies the position to write text on the matrix.
| Item | Type | Description |
|---|---|---|
| Position(x) | WRITE | Enter the starting position(x) of the text. The leftmost pixel is 0, and it increases towards the right. |
| Position(y) | WRITE | Enter the starting position(y) of the text. The topmost pixel is 0, and it increases downward. |
[PRINT_TEXT]
Sets text on the matrix. The SHOW command must be executed to display it on the screen.
| Item | Type | Description |
|---|---|---|
| Text | WRITE | Enter the text to display. |
| Size | WRITE | The size of the text. (1~255) |
| Auto Line Wrap | WRITE | Determines whether to automatically wrap lines when text exceeds the horizontal display length. |
| Color Type | WRITE | Select the type of color to set. |
Color Type: RGB
| Item | Type | Description |
|---|---|---|
| R | WRITE | Enter the R component of the color. (0~255) |
| G | WRITE | Enter the G component of the color. (0~255) |
| B | WRITE | Enter the B component of the color. (0~255) |
| W | WRITE | Enter the W component of the color. (0~255, applicable only to RGBW type LEDs) |
Color Type: HSV
| Item | Type | Description |
|---|---|---|
| H | WRITE | Enter the H (Hue) component of the color. (0~360) |
| S | WRITE | Enter the S (Saturation) component of the color. (0~100) |
| V | WRITE | Enter the V (Value, brightness) component of the color. (0~100) |
[DRAW_PIXEL]
Sets a pixel at the specified position on the matrix. The SHOW command must be executed to display it on the screen.
| Item | Type | Description |
|---|---|---|
| Position(x) | WRITE | Enter the position(x) of the pixel. The leftmost pixel is 0, and it increases towards the right. |
| Position(y) | WRITE | Enter the position(y) of the pixel. The topmost pixel is 0, and it increases downward. |
| Color Type | WRITE | Select the type of color to set. |
Color Type: RGB
| Item | Type | Description |
|---|---|---|
| R | WRITE | Enter the R component of the color. (0~255) |
| G | WRITE | Enter the G component of the color. (0~255) |
| B | WRITE | Enter the B component of the color. (0~255) |
| W | WRITE | Enter the W component of the color. (0~255, applicable only to RGBW type LEDs) |
Color Type: HSV
| Item | Type | Description |
|---|---|---|
| H | WRITE | Enter the H (Hue) component of the color. (0~360) |
| S | WRITE | Enter the S (Saturation) component of the color. (0~100) |
| V | WRITE | Enter the V (Value, brightness) component of the color. (0~100) |
[DRAW_LINE]
Sets a straight line on the matrix. The SHOW command must be executed to display it on the screen.
| Item | Type | Description |
|---|---|---|
| Start Point(x) | WRITE | Enter the starting point position(x) of the line. The leftmost pixel is 0, and it increases towards the right. |
| Start Point(y) | WRITE | Enter the starting point position(y) of the line. The topmost pixel is 0, and it increases downward. |
| End Point(x) | WRITE | Enter the ending point position(x) of the line. The leftmost pixel is 0, and it increases towards the right. |
| End Point(y) | WRITE | Enter the ending point position(y) of the line. The topmost pixel is 0, and it increases downward. |
| Color Type | WRITE | Select the type of color to set. |
Color Type: RGB
| Item | Type | Description |
|---|---|---|
| R | WRITE | Enter the R component of the color. (0~255) |
| G | WRITE | Enter the G component of the color. (0~255) |
| B | WRITE | Enter the B component of the color. (0~255) |
| W | WRITE | Enter the W component of the color. (0~255, applicable only to RGBW type LEDs) |
Color Type: HSV
| Item | Type | Description |
|---|---|---|
| H | WRITE | Enter the H (Hue) component of the color. (0~360) |
| S | WRITE | Enter the S (Saturation) component of the color. (0~100) |
| V | WRITE | Enter the V (Value, brightness) component of the color. (0~100) |
[DRAW_TRIANGLE]
Sets a hollow triangle on the matrix. The SHOW command must be executed to display it on the screen.
| Item | Type | Description |
|---|---|---|
| Point 1(x) | WRITE | Enter the position(x) of point 1 of the triangle. The leftmost pixel is 0, and it increases towards the right. |
| Point 1(y) | WRITE | Enter the position(y) of point 1 of the triangle. The topmost pixel is 0, and it increases downward. |
| Point 2(x) | WRITE | Enter the position(x) of point 2 of the triangle. The leftmost pixel is 0, and it increases towards the right. |
| Point 2(y) | WRITE | Enter the position(y) of point 2 of the triangle. The topmost pixel is 0, and it increases downward. |
| Point 3(x) | WRITE | Enter the position(x) of point 3 of the triangle. The leftmost pixel is 0, and it increases towards the right. |
| Point 3(y) | WRITE | Enter the position(y) of point 3 of the triangle. The topmost pixel is 0, and it increases downward. |
| Color Type | WRITE | Select the type of color to set. |
Color Type: RGB
| Item | Type | Description |
|---|---|---|
| R | WRITE | Enter the R component of the color. (0~255) |
| G | WRITE | Enter the G component of the color. (0~255) |
| B | WRITE | Enter the B component of the color. (0~255) |
| W | WRITE | Enter the W component of the color. (0~255, applicable only to RGBW type LEDs) |
Color Type: HSV
| Item | Type | Description |
|---|---|---|
| H | WRITE | Enter the H (Hue) component of the color. (0~360) |
| S | WRITE | Enter the S (Saturation) component of the color. (0~100) |
| V | WRITE | Enter the V (Value, brightness) component of the color. (0~100) |
[FILL_TRIANGLE]
Sets a filled triangle on the matrix. The SHOW command must be executed to display it on the screen.
| Item | Type | Description |
|---|---|---|
| Point 1(x) | WRITE | Enter the position(x) of point 1 of the triangle. The leftmost pixel is 0, and it increases towards the right. |
| Point 1(y) | WRITE | Enter the position(y) of point 1 of the triangle. The topmost pixel is 0, and it increases downward. |
| Point 2(x) | WRITE | Enter the position(x) of point 2 of the triangle. The leftmost pixel is 0, and it increases towards the right. |
| Point 2(y) | WRITE | Enter the position(y) of point 2 of the triangle. The topmost pixel is 0, and it increases downward. |
| Point 3(x) | WRITE | Enter the position(x) of point 3 of the triangle. The leftmost pixel is 0, and it increases towards the right. |
| Point 3(y) | WRITE | Enter the position(y) of point 3 of the triangle. The topmost pixel is 0, and it increases downward. |
| Color Type | WRITE | Select the type of color to set. |
Color Type: RGB
| Item | Type | Description |
|---|---|---|
| R | WRITE | Enter the R component of the color. (0~255) |
| G | WRITE | Enter the G component of the color. (0~255) |
| B | WRITE | Enter the B component of the color. (0~255) |
| W | WRITE | Enter the W component of the color. (0~255, applicable only to RGBW type LEDs) |
Color Type: HSV
| Item | Type | Description |
|---|---|---|
| H | WRITE | Enter the H (Hue) component of the color. (0~360) |
| S | WRITE | Enter the S (Saturation) component of the color. (0~100) |
| V | WRITE | Enter the V (Value, brightness) component of the color. (0~100) |
[DRAW_RECT]
Sets a hollow rectangle on the matrix. The SHOW command must be executed to display it on the screen.
| Item | Type | Description |
|---|---|---|
| Start Point(x) | WRITE | Enter the starting point (top-left) position(x) of the rectangle. The leftmost pixel is 0, and it increases towards the right. |
| Start Point(y) | WRITE | Enter the starting point (top-left) position(y) of the rectangle. The topmost pixel is 0, and it increases downward. |
| Width | WRITE | Enter the width of the rectangle. |
| Height | WRITE | Enter the height of the rectangle. |
| Color Type | WRITE | Select the type of color to set. |
Color Type: RGB
| Item | Type | Description |
|---|---|---|
| R | WRITE | Enter the R component of the color. (0~255) |
| G | WRITE | Enter the G component of the color. (0~255) |
| B | WRITE | Enter the B component of the color. (0~255) |
| W | WRITE | Enter the W component of the color. (0~255, applicable only to RGBW type LEDs) |
Color Type: HSV
| Item | Type | Description |
|---|---|---|
| H | WRITE | Enter the H (Hue) component of the color. (0~360) |
| S | WRITE | Enter the S (Saturation) component of the color. (0~100) |
| V | WRITE | Enter the V (Value, brightness) component of the color. (0~100) |
[FILL_RECT]
Sets a filled rectangle on the matrix. The SHOW command must be executed to display it on the screen.
| Item | Type | Description |
|---|---|---|
| Start Point(x) | WRITE | Enter the starting point (top-left) position(x) of the rectangle. The leftmost pixel is 0, and it increases towards the right. |
| Start Point(y) | WRITE | Enter the starting point (top-left) position(y) of the rectangle. The topmost pixel is 0, and it increases downward. |
| Width | WRITE | Enter the width of the rectangle. |
| Height | WRITE | Enter the height of the rectangle. |
| Color Type | WRITE | Select the type of color to set. |
Color Type: RGB
| Item | Type | Description |
|---|---|---|
| R | WRITE | Enter the R component of the color. (0~255) |
| G | WRITE | Enter the G component of the color. (0~255) |
| B | WRITE | Enter the B component of the color. (0~255) |
| W | WRITE | Enter the W component of the color. (0~255, applicable only to RGBW type LEDs) |
Color Type: HSV
| Item | Type | Description |
|---|---|---|
| H | WRITE | Enter the H (Hue) component of the color. (0~360) |
| S | WRITE | Enter the S (Saturation) component of the color. (0~100) |
| V | WRITE | Enter the V (Value, brightness) component of the color. (0~100) |
[DRAW_ROUND_RECT]
Sets a hollow rounded rectangle on the matrix. The SHOW command must be executed to display it on the screen.
| Item | Type | Description |
|---|---|---|
| Start Point(x) | WRITE | Enter the starting point (top-left) position(x) of the rectangle. The leftmost pixel is 0, and it increases towards the right. |
| Start Point(y) | WRITE | Enter the starting point (top-left) position(y) of the rectangle. The topmost pixel is 0, and it increases downward. |
| Width | WRITE | Enter the width of the rectangle. |
| Height | WRITE | Enter the height of the rectangle. |
| Corner Radius | WRITE | Enter the radius of the rectangle corners. |
| Color Type | WRITE | Select the type of color to set. |
Color Type: RGB
| Item | Type | Description |
|---|---|---|
| R | WRITE | Enter the R component of the color. (0~255) |
| G | WRITE | Enter the G component of the color. (0~255) |
| B | WRITE | Enter the B component of the color. (0~255) |
| W | WRITE | Enter the W component of the color. (0~255, applicable only to RGBW type LEDs) |
Color Type: HSV
| Item | Type | Description |
|---|---|---|
| H | WRITE | Enter the H (Hue) component of the color. (0~360) |
| S | WRITE | Enter the S (Saturation) component of the color. (0~100) |
| V | WRITE | Enter the V (Value, brightness) component of the color. (0~100) |
[FILL_ROUND_RECT]
Sets a filled rounded rectangle on the matrix. The SHOW command must be executed to display it on the screen.
| Item | Type | Description |
|---|---|---|
| Start Point(x) | WRITE | Enter the starting point (top-left) position(x) of the rectangle. The leftmost pixel is 0, and it increases towards the right. |
| Start Point(y) | WRITE | Enter the starting point (top-left) position(y) of the rectangle. The topmost pixel is 0, and it increases downward. |
| Width | WRITE | Enter the width of the rectangle. |
| Height | WRITE | Enter the height of the rectangle. |
| Corner Radius | WRITE | Enter the radius of the rectangle corners. |
| Color Type | WRITE | Select the type of color to set. |
Color Type: RGB
| Item | Type | Description |
|---|---|---|
| R | WRITE | Enter the R component of the color. (0~255) |
| G | WRITE | Enter the G component of the color. (0~255) |
| B | WRITE | Enter the B component of the color. (0~255) |
| W | WRITE | Enter the W component of the color. (0~255, applicable only to RGBW type LEDs) |
Color Type: HSV
| Item | Type | Description |
|---|---|---|
| H | WRITE | Enter the H (Hue) component of the color. (0~360) |
| S | WRITE | Enter the S (Saturation) component of the color. (0~100) |
| V | WRITE | Enter the V (Value, brightness) component of the color. (0~100) |
[DRAW_CIRCLE]
Sets a hollow circle on the matrix. The SHOW command must be executed to display it on the screen.
| Item | Type | Description |
|---|---|---|
| Center(x) | WRITE | Enter the center position(x) of the circle. The leftmost pixel is 0, and it increases towards the right. |
| Center(y) | WRITE | Enter the center position(y) of the circle. The topmost pixel is 0, and it increases downward. |
| Radius | WRITE | Enter the radius of the circle. |
| Color Type | WRITE | Select the type of color to set. |
Color Type: RGB
| Item | Type | Description |
|---|---|---|
| R | WRITE | Enter the R component of the color. (0~255) |
| G | WRITE | Enter the G component of the color. (0~255) |
| B | WRITE | Enter the B component of the color. (0~255) |
| W | WRITE | Enter the W component of the color. (0~255, applicable only to RGBW type LEDs) |
Color Type: HSV
| Item | Type | Description |
|---|---|---|
| H | WRITE | Enter the H (Hue) component of the color. (0~360) |
| S | WRITE | Enter the S (Saturation) component of the color. (0~100) |
| V | WRITE | Enter the V (Value, brightness) component of the color. (0~100) |
[FILL_CIRCLE]
Sets a filled circle on the matrix. The SHOW command must be executed to display it on the screen.
| Item | Type | Description |
|---|---|---|
| Center(x) | WRITE | Enter the center position(x) of the circle. The leftmost pixel is 0, and it increases towards the right. |
| Center(y) | WRITE | Enter the center position(y) of the circle. The topmost pixel is 0, and it increases downward. |
| Radius | WRITE | Enter the radius of the circle. |
| Color Type | WRITE | Select the type of color to set. |
Color Type: RGB
| Item | Type | Description |
|---|---|---|
| R | WRITE | Enter the R component of the color. (0~255) |
| G | WRITE | Enter the G component of the color. (0~255) |
| B | WRITE | Enter the B component of the color. (0~255) |
| W | WRITE | Enter the W component of the color. (0~255, applicable only to RGBW type LEDs) |
Color Type: HSV
| Item | Type | Description |
|---|---|---|
| H | WRITE | Enter the H (Hue) component of the color. (0~360) |
| S | WRITE | Enter the S (Saturation) component of the color. (0~100) |
| V | WRITE | Enter the V (Value, brightness) component of the color. (0~100) |
[FILL_SCREEN]
Fills the entire matrix with the specified color. The SHOW command must be executed to display it on the screen.
| Item | Type | Description |
|---|---|---|
| Color Type | WRITE | Select the type of color to set. |
Color Type: RGB
| Item | Type | Description |
|---|---|---|
| R | WRITE | Enter the R component of the color. (0~255) |
| G | WRITE | Enter the G component of the color. (0~255) |
| B | WRITE | Enter the B component of the color. (0~255) |
| W | WRITE | Enter the W component of the color. (0~255, applicable only to RGBW type LEDs) |
Color Type: HSV
| Item | Type | Description |
|---|---|---|
| H | WRITE | Enter the H (Hue) component of the color. (0~360) |
| S | WRITE | Enter the S (Saturation) component of the color. (0~100) |
| V | WRITE | Enter the V (Value, brightness) component of the color. (0~100) |
[DRAW_RGB_BITMAP]
Sets a BMP format image file on the matrix. The SHOW command must be executed to display it on the screen.
| Item | Type | Description |
|---|---|---|
| File Path * | WRITE | Enter the local path of the image file. (e.g., /home/pi/test.bmp) |
| Start Point(x) | WRITE | Enter the pixel position(x) where the top-left corner of the image will be located. The leftmost is 0, and it increases towards the right. |
| Start Point(y) | WRITE | Enter the pixel position(y) where the top-left corner of the image will be located. It increases downward. |
[SCROLL_TEXT]
Displays text on the matrix and moves it one position at a time to the left or right. When this command is executed at regular intervals, it creates a scrolling text effect.
| Item | Type | Description |
|---|---|---|
| Text | WRITE | Enter the text to display. |
| Size | WRITE | The size of the text. (1~255) |
| Auto Line Wrap | WRITE | Determines whether to automatically wrap lines when text exceeds the horizontal display length. |
| Scroll Direction | WRITE | Select the scroll direction. (Left, Right) |
| Color Type | WRITE | Select the type of color to set. |
Color Type: RGB
| Item | Type | Description |
|---|---|---|
| R | WRITE | Enter the R component of the color. (0~255) |
| G | WRITE | Enter the G component of the color. (0~255) |
| B | WRITE | Enter the B component of the color. (0~255) |
| W | WRITE | Enter the W component of the color. (0~255, applicable only to RGBW type LEDs) |
Color Type: HSV
| Item | Type | Description |
|---|---|---|
| H | WRITE | Enter the H (Hue) component of the color. (0~360) |
| S | WRITE | Enter the S (Saturation) component of the color. (0~100) |
| V | WRITE | Enter the V (Value, brightness) component of the color. (0~100) |
[SHOW]
Displays the configured content on the matrix.
[CLEAR]
Turns off all LEDs.
Example
Objective
When the dashboard widget button is pressed, display the following in order:
- Red “Hello” text scrolling to the left
- A white circle with radius 3
- Bitmap image
Parts
| Part | Quantity |
|---|---|
| Raspberry Pi 4 * | 1 |
| NeoPixel Matrix | 4 |
| 5V DC Power Supply | 1 |
Wiring
| 5V DC Power ** | NeoPixel Matrix | GPIO |
|---|---|---|
| + | +5V | |
| | Din | 12 * |
| – | GND | GND |
** Use an appropriate external DC Power Supply considering the voltage and current consumption of the LEDs.

The connected configuration is as follows:
- Matrix width pixel count: 8
- Matrix height pixel count: 8
- First pixel position: Top Left
- Pixel direction: Horizontal
- Pixel layout: Progressive
- Matrix horizontal count: 1
- Matrix vertical count: 1
- First matrix: Top Left
- Matrix layout direction: Horizontal
- Matrix layout type: Progressive
Project Link
