Grablo Help Grablo Help
  • User Manual
  • Tips
  • News
  • Go to
    • Grablo Home
    • Grablo App
  • 한국어
Grablo Help Grablo Help
문의하기
Grablo Help Grablo Help
  • User Manual
  • Tips
  • News
  • Go to
    • Grablo Home
    • Grablo App
  • 한국어
loading
  1. Home
  2. Tips
  3. Basics
  4. 3.3V ↔ 5V Conversion
Updated on August 11, 2025

Tips

  • Folder icon closed Folder open iconBasics
    • Bits and Bytes
    • Digital Input/Output
    • Digital/Analog Signals
    • Calculating LED Resistor Values
    • Pull-up/down Resistors
    • 3.3V ↔ 5V Conversion
    • Serial Communication (UART)
    • DC Motor, Servo Motor, Stepper Motor
    • Multi Thread
    • Relay
  • Folder icon closed Folder open iconHardware
    • Raspberry Pi
      • GPIO
      • Installing Operating System
      • How to Change 1-Wire Pin
      • How to Find I2C Device Addresses
      • Raspberry Pi vs Arduino
      • Serial (UART) Port
      • Using Desktop Environment with VNC
    • Beagle Bone
      • GPIO
      • Installing Operating System
    • Jetson Nano
      • GPIO
      • Installing Operating System
    • GPIO Expander
      • FT232H/FT2232H/FT4232H
      • MCP2221A
      • NUMATO USB-GPIO
  • Folder icon closed Folder open iconLinux
    • Linux Directory Structure
    • Configuring Linux Auto Login
    • Installing Linux on Windows (Virtual Machine)
    • Installing Linux on macOS (Virtual Machine)
    • Installing SSH Server
    • Finding Your Controller’s IP Address
    • Connecting via SSH
    • Transferring Files Between PC and Controller
    • Fixing “User is not in the sudoers file” Error
  • Folder icon closed Folder open iconAudio/Video
    • Fixing Audio Stuttering and Latency Issues
    • Playing Audio Through Bluetooth Speakers
    • Selecting Instruments from SoundFont Files
    • Fixing “Failed to create new vlc instance” Error
  • Folder icon closed Folder open iconDatabase
    • Setting Up Firebase Database
  • Folder icon closed Folder open iconIoT
    • Setting Up Google Cloud TTS/STT
    • Setting Up OpenAI TTS/STT
    • Setting Up ElevenLabs TTS
    • Setting Up Telegram Bot
    • Getting Data from WeatherAPI.com

3.3V ↔ 5V Conversion

Estimated reading: 2 minutes 316 views

The operating voltage of Raspberry Pi’s GPIO input/output pins is 3.3V. Therefore, to connect 5V-only sensors and modules or to communicate with devices that operate at 5V such as Arduino, 5V ↔ 3.3V conversion is absolutely necessary.

Connecting 5V to a 3.3V device can damage the device, so caution is required.


There are mainly two methods for voltage conversion as shown below.

​

Voltage Divider

A voltage divider refers to a circuit configured as shown below that uses resistors to reduce voltage.

​https://en.wikipedia.org/wiki/Voltage_divider

​

​According to Ohm’s law, the output voltage of a voltage divider can be calculated using the following formula:

​

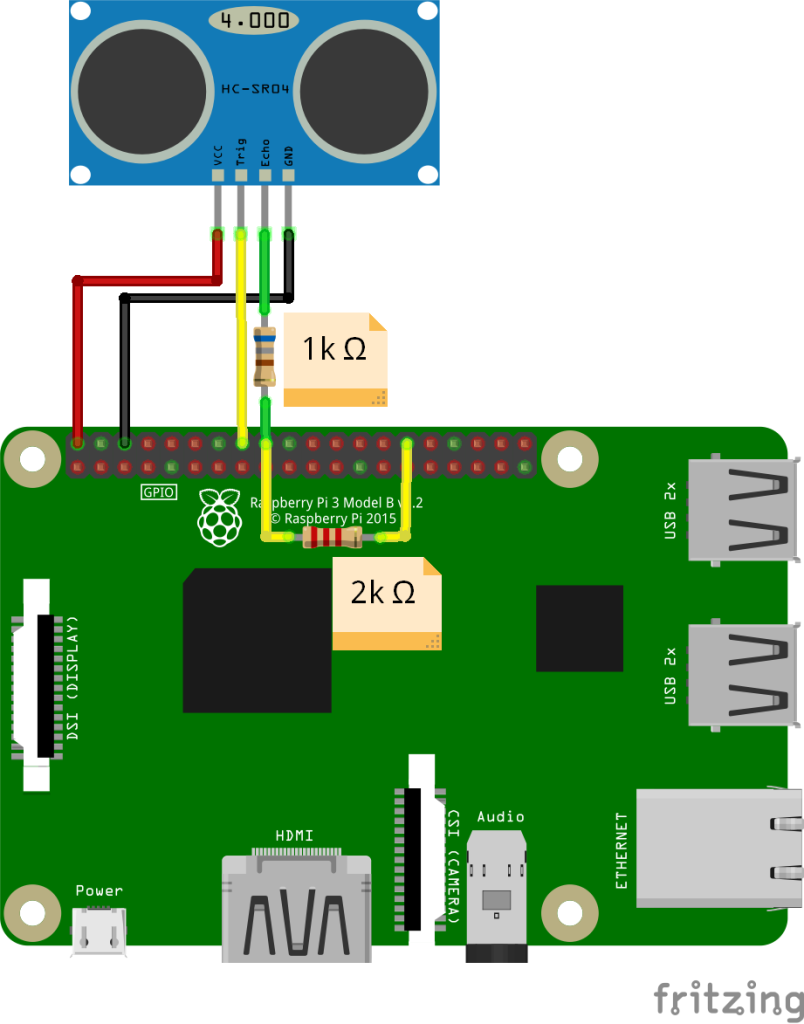
For example, to connect a sensor that outputs 5V to a Raspberry Pi, when the voltage needs to be reduced to 3.3V, using R₁: 1kΩ and R₂: 2kΩ will output Vout = (2/3)*5V = 3.3V.

​You can easily calculate the required resistor values using a Voltage divider calculator.

​

Below is an example of connecting an HC-SR04 ultrasonic sensor to a Raspberry Pi through a voltage divider. Since the Echo pin output of HC-SR04 is 5V, the voltage must be reduced to 3.3V before connection.


Logic Level Converter

A module that can increase or decrease voltage in one direction (uni-directional) or convert voltage in both directions (bi-directional).

​​

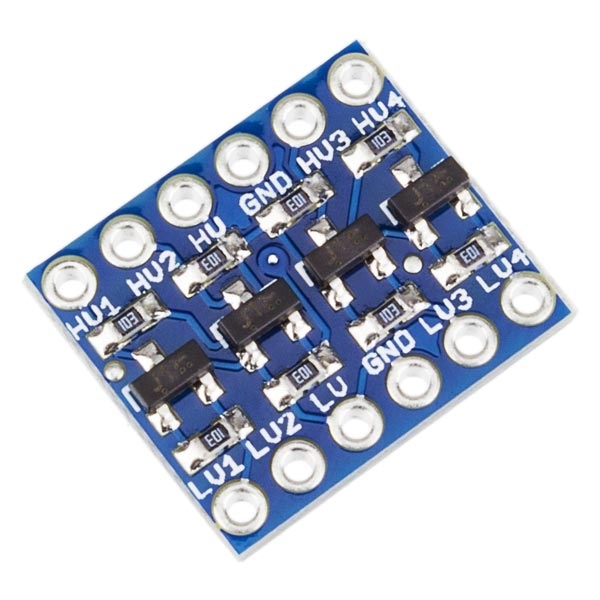
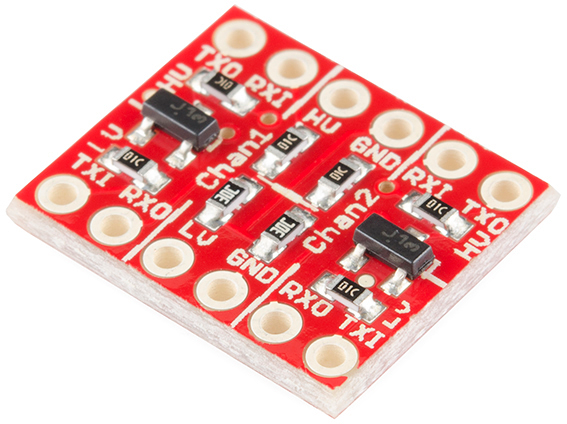
Usually, one module supports multiple channels, allowing multiple devices to be connected simultaneously, and can be used in the following cases:

  • Connecting 3.3V output sensors or modules to 5V devices
  • Connecting 5V output sensors or modules to 3.3V devices
  • Communication between 3.3V devices and 5V devices
• 3.3V devices: Raspberry Pi, BeagleBone, Jetson Nano, Arduino Due, Arduino Zero, Arduino Nano 33 IoT, etc.
• 5V devices: Arduino Uno, Arduino Nano, Arduino Mega, Arduino Leonardo, etc.

​

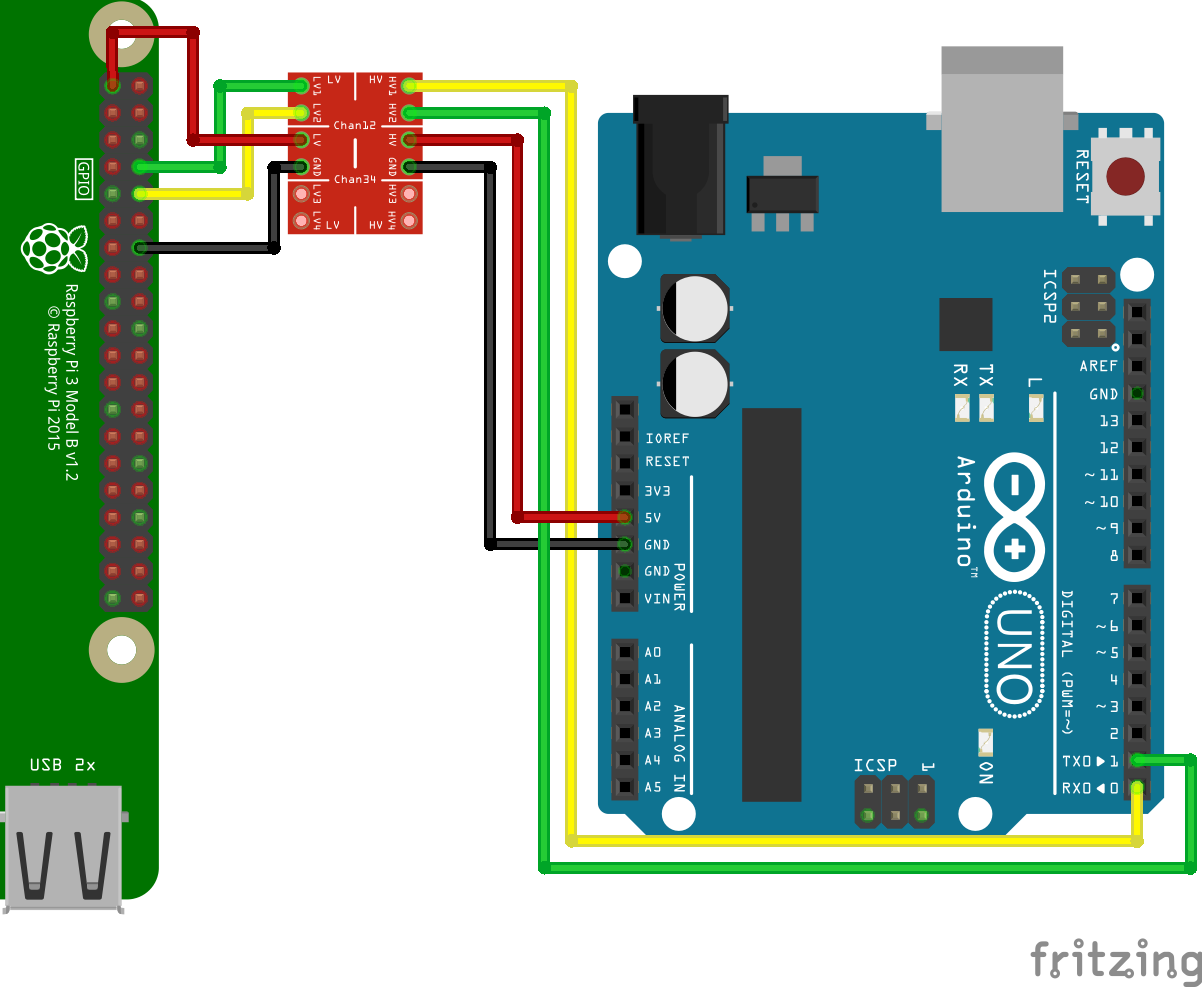
Below is an example of UART communication connection between Arduino Uno and Raspberry Pi using a bidirectional logic level converter. (Note that the higher voltage should be connected to HV and the lower voltage to LV)

​

​

찾으시는 내용이 없나요? 문의하기

문의하기

공유하기

3.3V ↔ 5V Conversion

Or copy link

Clipboard Icon
콘탠츠

ㅤ

Grablo Inc.
support@grablo.co

Site Links

  • Grablo Home
  • Grablo App

이 사이트의 모든 컨텐츠는 저작권법에 보호받는 저작물로서, 무단으로 복제, 배포하는 경우에는 저작권법에 의하여 처벌을 받을 수 있습니다. Copyright 2024 grablo.co. All Rights Reserved.